Canvas Toolbar
|
Canvas toolbar with drop-down menus revealed |
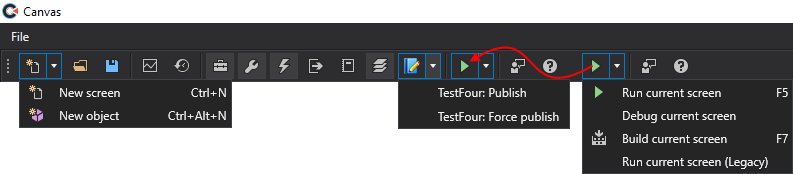
In the main Canvas window, the following command options are available from the application toolbar. See Running Canvas Screens for information about the Canvas Viewer toolbar.
| Icon | Tooltip | Description | Backstage View | Keyboard Shortcut | ||
|---|---|---|---|---|---|---|
|
|
Create a new screen (Ctrl+N) |
Click the down arrow to open the drop-down menu showing two options. Select the desired action:
|
File > New
|
Ctrl+N |
||
|
|
|
Click New screen or type Ctrl+N to open a new screen file containing both design and script views. The default script language is set in the General Settings in the Backstage view: either in C# or VB.NET. Use Ctrl+T to toggle between Design and Script views.
|
File > New > Create C# screen File > New > Create VB screen |
Ctrl+N Ctrl+T |
||
|
|
|
Click New object or type Ctrl+Alt+N to open a new object file containing both design and script views. The default script language is set in the General Settings in the Backstage view: either in C# or VB.NET. Use Ctrl+T to toggle between Design and Script views. |
File > New > Create C# object File > New > Create VB object |
Ctrl+Alt+N Ctrl+T |
||
|
|
Open an existing screen (Ctrl+O) |
Accesses the Backstage view to open an existing screen file from an APPS or BSS folder or from a local or network file-system folder. |
File > Open |
Ctrl+O |
||
|
|
Save currently selected screen (Ctrl+S) |
Saves a selected existing screen file to an APPS or BSS folder or a local or network file-system folder, with the same file name OR accesses the Backstage view Save as dialog box to name and save a new screen file to a specified location. |
File > Save |
Ctrl+S |
||
|
|
Open chart |
|
|
|
||
|
|
Show historical playback |
|
|
|
||
|
|
Display toolbox |
Displays/hides a Toolbox pane and pins it to the left side of the window by default when open. |
||||
|
|
Display properties |
Displays/hides a Properties pane and pins it to the right side of the window by default when open. |
||||
|
|
Display events |
Displays/hides an Events pane and pins it to the right side of the window by default when open. |
||||
|
|
Display output |
Displays/hides an Output pane and pins it to the bottom of the window by default when open. |
||||
|
|
Display logs |
Displays/hides a Log Viewer pane and pins it to the bottom of the window by default when open. |
|
|
||
|
|
Display layers |
|
|
|
||
|
|
Publish to Web |
Click the down arrow to open a drop-down menu to show the active Thin Web Client application. You can Publish or Force publish the application from the toolbar. Select the desired action:
Note: Applications can also published from the Web settings > Application page in the Backstage view. |
|
|
||
|
|
Run selected screen (F5) |
Click the down arrow to open the drop-down menu showing four options. Select the desired action:
|
|
F5 |
||
|
|
|
Click Run current screen or type F5 to open a Canvas Viewer preview window for the currently selected screen, which floats in front of the current window by default. See Running Screens for more information. |
|
Ctrl+E, F5 |
||
|
|
|
Click Debug current screen to open a Canvas Viewer debug window for the currently selected screen, which floats in front of the current window by default. See Debugging Screens for more information. |
|
|
||
|
|
|
Click Build current screen or type F7 to compile the screen into a series of temporary files, making it possible to run/debug the screen. The output of the build operation is displayed in the Output pane where you can view compiler status, including success or individual error messages. See Output Pane for more information. |
|
F7 |
||
|
|
|
Click Run current screen (Legacy) to preview a screen in the legacy run mode. Note: The new run mode implemented in Canvas v9.4 and later does not support panning and zooming. Thus, Canvas has retained the old method of running screens for backwards compatibility. If you need to pan and zoom on a specific screen (configured via the IsPanZoomEnabled property on a screen), you will not be able to take advantage of the performance improvements the new run mode supports. The legacy run mode is accessible from the Run icon on the Canvas toolbar: Run > Run current screen (Legacy). |
|
|
||
|
|
Send feedback (Ctrl+F) |
Opens a Submit Feedback dialog box to quickly share your thoughts about Canvas. See Providing Canvas Feedback for more information. |
File > Feedback |
Ctrl+F |
||
|
|
Launch help (F1) |
Opens the CygNet Help in a browser window. Find the Canvas Help in the Contents pane on the left. is See Using the Canvas Help for more information. |
|
F1 |

 Open a previously saved default chart. Choose the location where the default chart is saved in the Open dialog box, either in an APPS or BSS folder or a local or network file-system folder. See

